Making Clay ModelsAfter preparing a large lump of clay, I use a scale to weigh small balls of clay 200 grams apiece, the approximate size of an apricot.
An essential step in making any form is deciding how wide to make the base. For plates or shallow bowls, most of the clay goes outward (width) rather than upward (height). These models were centered and then flattened. The next steps were to open, widen, compress the floor of the pot, and finish the rim. The diameter of the base remains consistent throughout. When the models have dried to "leather hard" they are firm enough to handle without distorting. I smooth the bottom of each model by hand. If I plan to bisque fire the models for durability, I hollow out excess thickness from underneath as needed for successful firing. The models in the lower photo illustrate "trimming the foot." Starting with the model in the foreground on the left (widest one) track the progression clockwise (up, right, down) to finished plate. Excess clay is shaved off with sharp tools similar to lathe work for wood. Two trays of models fit on the tabletop of a potter's wheel. Others can perch on a chair or shelf for students to view. These stackable plastic trays are available in jewelery supply catalogs. 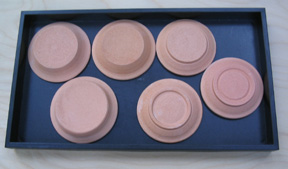
Copyright 2003 Cinda Mefferd |