|
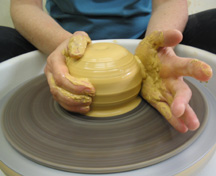
1. how it works
Centering occurs, when hands are positioned to surround clay in a balanced manner, and clay spins through the hands, conforming to them. Similar to squeezing a balloon to shift the air inside, when I press my hands inward towards each other (making the clay narrower), the clay "goes up" into a taller dome or cone shape (not shown). Hence the name "up" position. Later, in another stage, when the clay rises into a taller cone, both hands will wrap around the clay. |
|
|
2. slip
I intentionally place smooth slip (clay plus water) that is the consistency of frosting in the palms of my hands to lubricate the clay and protect my hands from the sandy feel of some clays. This generous amount of slip bastes the clay and allows me to use less water. Notice, however, the sheen of water on the clay. The slip is not too thick or dry. At regular intervals when the clay feels dry, I apply more water without scooping handfuls of water onto the clay. Too much water washes away the slip and makes the clay soggy. |
|
|
3. parts of my hands
My right hand encloses the clay. It features a "claw grip" that provides strength, dexterity, and a slight finger-cut into the clay that eliminates uneven bumps in the clay. For my left hand, the heel-of-the-hand offers a broad, strong, flat surface to place against the clay. The open posture of that hand with palm tilted slightly upward helps me reach the base of the clay, the area both hands are focused on. The fingers of my left hand are out of the way for two reasons: 1. To avoid poking the clay as it spins counterclockwise into my left hand. 2. When I bend my left wrist to use the heel of my left hand, my fingers naturally go out. |
|
|
4. analogy of a clock face
Imagine a clock face on top of the clay. Visualize the number 12 in the foreground and 6 closest to me. Circle clockwise to find: 12, 3, 6, 9, and the numbers in between. My left hand is placed at approximately 8. Directly across the clay, the fingers of my right hand are in the vicinity of 2. This is an example of "pressure and counter pressure." As I press my hands together, the clay is contacted evenly on each side in an intentionally matched application of pressure. |
|
|
5. direction potter's wheel is spinning
Because I am right-handed, the potter's wheel is spinning counterclockwise. I push my left hand forward slightly to counterbalance the spin, and pull my right hand back a bit, towards my waist. This "push-pull" (push forward with my left hand, pull back with my right hand) is a subtle addition to the "up" position for centering that helps stabilize my hands. The push-pull has a locked in feel that synchronizes my hands. |
|
|
6. if you are left-handed
Beginners say, "Everything about potting is new to me, so why does it matter which way I get used to?" Spinning the potter's wheel in the correct direction maximizes the dominant hand's coordination, strength, and use of tools. If you are left-handed, spin the wheel clockwise, and reverse the hand placements in this photo. Where you see my right-hand fingers grip, grip with your left-hand fingers. Where you see my left-hand's-heel, substitute your right. Learn to automatically check for correct wheel-spin direction. If you are ambidextrous, experiment, but consistently match hand-positions with correct wheel-spin direction. One woman made pots right-handed (counterclockwise wheel-spin) and trimmed them left-handed (clockwise spin). "Trimming" is a finishing step. |
|
|
7. wrist positioning
Observe how the bend of my left wrist allows me to make contact with the clay as shown. Note that neither wrist is bent more than 45 degrees. Excessive bend is painful. The bend of my right wrist helps my entire hand grip the clay firmly with dexterity. To experience this, pretend like you are gripping a tennis ball in your right hand. The clay is larger, but the basic grip which resembles the letter "C" in reverse is the same. For both of my arms, the general reach is straight ahead. Within that straight ahead reach, three sub movement options are: To bend or straighten my wrists; to open or close my hands; to move my elbows closer to my body or farther away from it. Elbow position affects wrist position. |
|
|
8. height of potter's wheel
Like determining a comfortable keyboard height for typing, sit at the potter's wheel and extend your hands forward, parallel to the floor. My wheel is elevated on three-inch wooden blocks. Thus, I reach down only slightly to rest my forearms on the wheel's splash pan for stability. With this wheel height, my wrists are not tilted up or down uncomfortably. There are four sets of variables to consider for wheel height. The are: How tall the potter, chair, wheel, and wheel's splash pan are; the amount of clay being used; the potter's preferences and style of working; the potter's health including weak and strong areas of the body. Experiment to see what works best for you. |
|
|
9. apply even pressure right and left
When my hands press inward toward each other, I am not lifting, undercutting, or pulling upward in a way that will dislodge the clay or tear off the top. With the sides of my hands resting on the "bat" or Masonite disk covering the aluminum wheel head, I apply pressure evenly from the left and right sides. If I press too hard with one hand without a corresponding amount of pressure from the other hand, the clay is likely to lean sideways or slip away from the center of the wheel. If your clay leans or slides, stop the wheel and evaluate it. If mildly crooked, push it back to the middle. If far off center and slippery on the bottom, clean off the wheel, wash and dry your hands, and start with a new piece. I also imagine a midline between the right and left halves of the clay. I do not cross that midline. |
|
|
10. analogy of hands clapping
Many people applaud as pictured (without the clay in the middle). Clap a few times in the air to see how your hands meet. Is the basic motion of: heel of one hand contacts center of other hand familiar? You can also clap once, keep your hands touching and observe your wrists. How much are they bent? How does the way each wrist is bent help your hands fit together? |